
A Study in Lighting CG Objects Through Compositing
- Conner Milam
- Oct 27, 2020
- 6 min read

Updated: Nov 5, 2020
Day 1: March 31st, 2020
- Today I started the project. I created a new camera which I renamed "rendercam," and added an image plane projecting from it. I used the image with the cube in it. Then, I attempted to match the camera's view by inserting a cube in the scene and trying to align it with the cube in the 2D image plane. Although it is not perfect at the moment, I am getting close. Using the correct focal length was key in making sure the dimensions of the cube align properly. The image below shows how close I was able to get it, I leave it for tomorrow to be able to get it just right.
Focal Length = 116 mm
Camera = Canon EOS 5D Mark III
Dimensions = 5760 x 3240
Tasks for tomorrow:
- align cube perfectly
- set up render layers
- set up sky dome
- set up spotlight

Attempt to align cube to 2D image plane.
------------------------------------------------------------------------------------------------------------------------------------------------------ Day 2: April 1, 2020 - Today I added the skydome to the scene (seen in the image below). I also moved the pinch of the skydome to the center of the frame. I also added in a ground plane which I projected the clean plate onto using the perspective of the render cam. This will give the correct bounce light from underneath the cube. Along with this I set up the render layers for Beauty, Shadow, and Occlusion. These render layers will make it easy and quick to render out everything I need, all at once. It will also be nice to use these layers to do layer overrides on settings I want to change for only one of these layers and not the others. I have added all of the objects to each layer but, in order to properly use them, I need to hide certain objects and make other visible, while also making some objects exclusive to certain layers. Tasks for tomorrow: - add spotlight to match cube shadow from image. - make render layers more organized

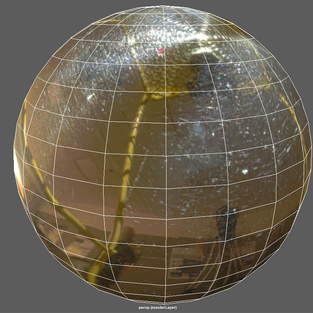


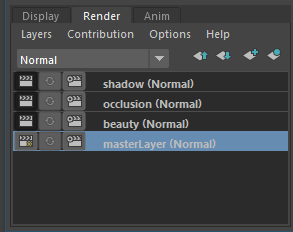
Left: Skydome, Middle: Aligned Cube, Right: Render layers
------------------------------------------------------------------------------------------------------------------------------------------------------
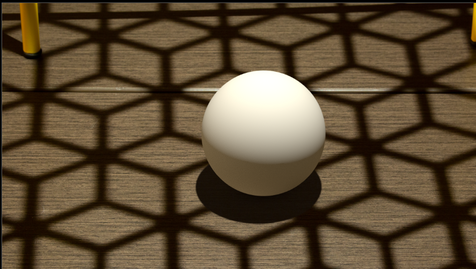
Day 3: April 2, 2020
- The main task for today is creating the main spotlight for the scene and matching the shadow from the 2D image plane. So far, the shadow is in the right angle, but I am having trouble getting it to look right based on the background plate. The color of the shadow is not reacting to the light from the skydome and the shadow's placement is a bit odd from the plate. Here is what I managed to get so far. I think the issue could come from the intensity of the spotlight in the scene. Further testing tomorrow will help me to figure out the issue.
Tasks for tomorrow:
- organize render tabs
- further work on shadow
- render out test images and composite into Nuke


Left: My render, Right: Cube Plate
------------------------------------------------------------------------------------------------------------------------------------------------------
Day 4: April 3, 2020
- I went ahead and organized the render tabs so that I can keep better track of my objects and am able to render quickly towards the end of the project. I also was working on the shadow some more and I started using a sphere to do this. I also took out some test renders to start setting up my node tree in Nuke. I was having some trouble with this though, the color of the background plate changed for some reason and I couldn't figure out what the issue was. Shown below is what I got so far compared to the actual background plate.
Tasks for tomorrow:
- fix Nuke composite


Left: First composite in Nuke, Right: Sphere plate
------------------------------------------------------------------------------------------------------------------------------------------------------
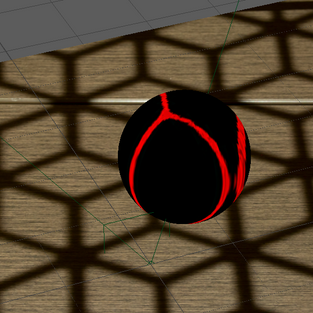
Day 5: April 6, 2020
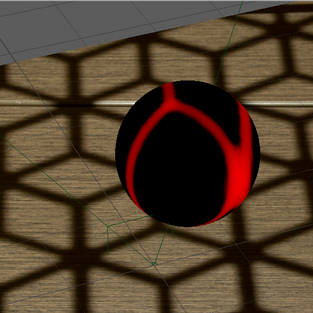
- Today we learned about projecting the environment shadow onto our object for the composite to make more sense in the end. If we just plopped the sphere into the scene then it wouldn't look natural when it doesn't have a top shadow similar to the ground that it's sitting on. To get this projected shadow, we need a camera in the same position as the key light. So first, I created this camera and rendered out an image (seen below). I then took it into Photoshop and selected-by-color to select all of the area with the shadow. I then turned the shadow red and the rest of the image black to give it an alpha to be able to re-implement into the scene projected from the previously made key light camera.
Tasks for tomorrow:
- fix Nuke
- implement environment shadow back into the scene


Left: 'Keylightcam' rendered image, Right: Shadow alpha
------------------------------------------------------------------------------------------------------------------------------------------------------ Day 6: April 7, 2020 - I figured out the issue I had with Nuke. For some reason the white balance changed between pictures for the original photographer. Below are the clean plate and the shadow plate together. As you can see, it appears the white balance changed between photos. This caused one shadow to be slightly more orange than the other. To fix this, I used a color correct node to change the color of the shadow plate to match the clean plate's shadow. Doing this completes the node tree for right now. The placeholder images will be replaced with the final images towards the end of the project. Tasks for tomorrow: - implement projected shadow and test new composite - animate ball


Left: Comparison of clean plate and shadow plate, Middle: Current Nuke node tree, Right: ColorCorrect settings
------------------------------------------------------------------------------------------------------------------------------------------------------
Day 7: April 8, 2020
- During class we went over how to project the environment shadow into the scene. This can be done by creating a new material and assigning it to whatever object you want to have the shadow, and linking the perspective to the key light camera, made previously. Shown below are my first and second attempts at this. The first attempt at creating the alpha for the shadow, I soon realized, was inadequate. I tried putting it into Nuke and came to understand what the alpha, coming out of Photoshop, should look more like. The second attempt was far more successful in its implementation into the composite. However, I am a bit stuck on making it look realistic. I will probably need to get some advice from my professor on what I should change. The node tree below shows how I implemented it. It took a little tweaking still to make the shadow look as decently as it does now. I had to use a grade node to make sure that the alpha wasn't as see-through as I wanted it to be. I clipped the white channel with it as well to make sure it didn't have numbers that were outrageous. I will need to do further work on the shadow to make sure it looks a bit better in the next few days.
Tasks for tomorrow:
- animate ball
- better shadow
- better ball shader


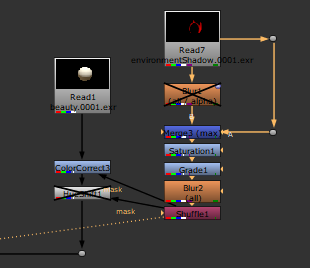


Top Left: first shadow alpha attempt, Top Middle: first shadow attempt composite,
Top Right: second shadow alpha attempt, Bottom Left: second shadow alpha attempt composite, Bottom Middle: shadow alpha node tree, Bottom Right: shadow alpha after adjustments
------------------------------------------------------------------------------------------------------------------------------------------------------
Day 8: April 9, 2020
- Today I continued work on the shader and shadow of the ball. While the shader didn't need too much improvement, the shadow did. Compared to yesterdays' work, the shadow today is much more realistic. I made the shadows blend together in Nuke using difference on the merge node. Also, in Maya, I turned up the "Radius" setting in the key light to make the edge of the shadow have a bit of a feathering to it to help it seem more realistic and less perfect compared to the shadows in the environment.
Tasks for tomorrow:
- Add occlusion shadow to under-side of ball
- Deconstruct ball AOVs to be able to color correct shadow
------------------------------------------------------------------------------------------------------------------------------------------------------
Day 9: April 10, 2020
- I worked on making the ball feel more grounded by applying an occlusion shadow to the under-side of the ball. I did this by using the pre-existing occlusion render that I had. For some reason I had only used the occlusion render to give the ground occlusion but I needed to mask the ball part out of that render to make it only apply on the ball as well. To do this, I merged the alphas from the ball and the occlusion render to make it mask out only the part that affects the ball. I also deconstructed the ball's AOV's and then reconstructed. This allows me to be able to only color correct certain parts of the ball, this is where I needed to merge-in the environment shadow layer so that I can more easily color correct the shadow to match the shadow of the ball. At this point I think the project is ready for submission. I will continue to work on it to be able to further improve. Below, I have the movie file that I submitted.
Tasks for resubmission based on critique:
- Add bump map to ball
- Make breakdown more thorough
- Environment shadow needs higher resolution
- Extend environment shadow


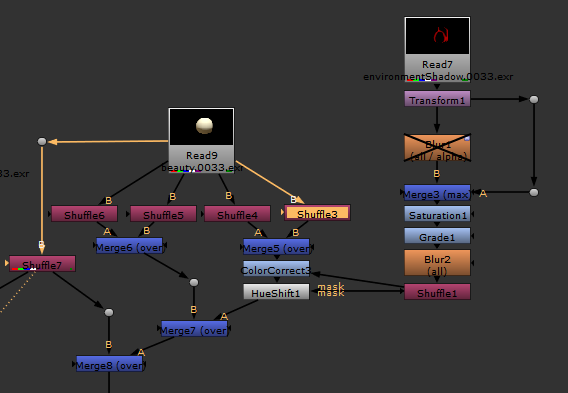
Left: Node tree for occlusion shadow merge, Right: Node tree for ball reconstruction and environment shadow color correct

Comments